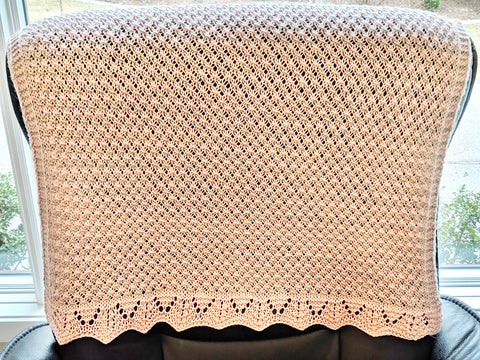
How I Created the Twinkle Star Baby Blanket
Learn How To Make The Twinkle Star Baby Blanket
Doug, one our employees, and his wife will be having their first baby in May. I wanted to make something special for them, so I decided to create a vintage-style baby blanket that looks nice on both sides and is machine washable.

After searching hundreds of patterns, I didn't see anything that truly inspired me so I went to foundational stitch dictionaries like A Second Treasury of Knitting Patterns by Barbara Walker and The Japanese Knitting Stitch Bible by Hitomi Shida. Among these I found a cute garter stitch lace edging and matching star stitch pattern. I changed my increases to yarn overs instead of M1p to make the fabric more lightweight and it also made it a little easier to knit.
Overcoming Challenges
Creating a pattern and knitting this blanket in 3 days posed a few challenges to overcome. Here's a few of them:
- Inspiration - finding a blanket pattern to get excited about
- Creating matching fabrics for the edge and body
- Finding compatible stitch counts for edge and body
- Time! I got my idea on Friday...my Technique Tuesday was only a few days away!
- Choosing a yarn that would work for the blanket
- Getting the gauge / blanket size right after blocking
- Mastering the star stitch (See videos below)
- Creating a pattern to share with others
How I made my Twinkle Star Baby Blanket
- Using Chiaogoo needles in US #5 and #8, 32-inch circulars. I used the German twisted Cast On also known as the Old Norwegian Cast On.
- I slipped stitch the last stitch of each row purlwise with yarn in back or front depending on which stitch will be knit on the next row in order to create a nice finished looking edge.
- How I chose my yarn: This will be a winter blanket for baby Miley. I used Hikoo Sueno DK-weight and my goal was to have a two color vintage looking baby blanket that blocked out to be 30” X 40” when finished. I used colors Ballet Slipper (#1116) and Shifting Sands (#1108)
- I settled on a nice lace edging for the top and bottom with the Star Stitch as the central motif. I had two options: one using a YO for the increase and the other using a M1p. I decided to use the YO method as this one created less density and was an easier increase to knit. I had to purl through the back loop on my YOs in order to close the holes that would otherwise be created by the YOs.
- I chose my star stitch from the Barbara Walker book. I was looking for a semi vintage look that had some substance to it so that it would hold its own with my garter and lace border edge. I was trying to find something that looks good on both sides as well.

Supplies needed for project
Pattern: The Twinkle Star Baby Blanket by Kelley Hobart. This is a free download on Alpaca Direct.
Yarn: I used 2 skeins of Sueno DK in each color 1116 Ballet Slipper and 1108 Shifting Sands.
Needles: Chiaogoo Red Lace US #5 and #8’s 32 inch circulars or in size needed to obtain gauge.
Stitch markers: Locking stitch markers from Alpaca Direct
Video Tutorials
Here's a quick tutorial on the Star Stitch (About 1 minute)
There is also a little technique in this pattern that can be tricky so I made a video to show you how to Purl Yarn Overs Through the Back Loop (About 2 minutes)
Here's a replay of my Technique Tuesday episode where I shared my challenges with making this blanket and the star stitch techniques to bring it to life! (About 30 minutes)
I hope enjoy knitting this vintage blanket and it finds it's way to a wonderful baby being welcomed into our world. :)